Polyurea & Polyaspartic
Unveiling the Pitfalls of 1-Day Polyaspartic and Polyurea Garage Floor Coatings
Polyureas (and polyaspartics) are quick-cure coatings and begin curing the moment they come in contact with the concrete, curing in one hour or less. In the presence of moisture in the concrete (or on humid days), these coatings, paradoxically, cure even faster. This is one reason why application of these coatings is best left with professionals, who have perfected speedy application with rollers or squeegees.
It is also the reason why polyureas are, frequently, not the best choice as direct-to-concrete primers. Their quick-cure property, which is very much amplified in the presence of moisture, doesn’t allow for proper penetration into the porous concrete.
What potential problems or issues could arise when applying polyurea garage coating?
Polyurea coatings, like all coating types – epoxies, polyurethanes or polyurea-polyaspartics – have their benefits and disadvantages. Quality polyureas and polyaspartics (a polyaspartic is simply an aliphatic polyurea) are excellent “quick-cure” coatings that can provide extreme UV, chemical, stain and impact resistance.
However, polyureas do have an Achilles heel (as all coatings do). These quick-curing coatings poorly adhere to concrete in the presence of moisture, so they are questionable as “direct-to-concrete” primer coats. It is somewhat of a paradox, but quick-cure polyurea-polyaspartic coatings cure faster still in the presence of concrete moisture (or humidity in the air). And it is precisely the enhanced curing speed in the presence of moisture, of an already fast-curing polyurea, that prevents these coatings from deeply penetrating porous concrete.
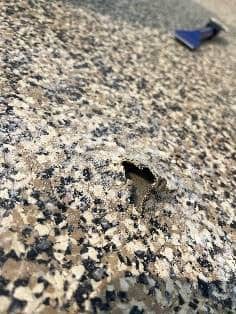
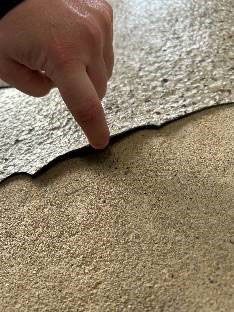
When applied as primers in the presence of medium to high concrete moisture, a thin, poorly penetrating polyurea primer layer has a propensity to peel as hydrostatic (moisture) pressures build over time. (This is why “1-day polyurea” applicators add warranty exclusions to “moisture-related issues”, “hydrostatic pressure”, “moisture vapor transmission”, etc.).
What type of questions should a homeowner ask before hiring a contractor?
Aside from the standard question: “Are you licensed, bonded and insured?”, the most important question a homeowner should ask before hiring a contractor pertains to the warranty of the installed coating (or more specifically, the warranty exclusions).
In our experience, many coating contractors offer a “lifetime warranty”, “limited warranty” or long warranty (15 – 20 years) for full-flake, residential garage floor coatings. However, many add warranty exclusions for “moisture-related issues”, “hydrostatic pressure”, “moisture vapor transmission” and even hot tire markings and staining. Because these issues represent the most common reasons for coating system failures, excluding them effectually negates the warranty. (We call them “sleight-of-hand” warranties). If bubbling, peeling or staining occurs, the contractor simply invokes the applicable “warranty exclusion” and the customer is left hanging.
More than anything else, it is the warranty exclusions that show the contractor’s hand. For this reason, customers must ask each bidding contractor to clearly show their warranty exclusions. If the contractor is confident in their coating products and installation process, “moisture-related issues” and staining should be fully covered, whatever the warranty duration is.

Can you briefly describe the process from booking the initial appointment to completion?
We’ll describe the process for a full-flake coating system – within our network of installers, these are the best-sellers. (Note that there are other types of coating systems, including solid color, partial flake, metallic, and seal & stain coating systems, whereby the process would differ slightly).
- Step 1 (On-Site Estimate): The scheduled on-site estimate begins with a general assessment of the concrete space to be coated (the garage). The presence of an existing coating and the extent of concrete damage is assessed. Concrete moisture measurements are taken, as are accurate measurements of the horizontal and vertical square footage to be coated. The coating system and flake blend are selected by the customer and the installation date is fixed.
- Step 2 (Concrete Prep): On Day 1 of the scheduled installation, any cracks, breaks, pitting, etc. are repaired with a moisture-mitigating concrete patch system. Saw cuts, isolation joints and tool joints are filled. Then, the concrete is ground with a propane diamond grinder (and hand grinders for peripherals and verticals) to eliminate contaminants (stains) and create the perfect concrete “profile”. All grinding equipment is attached to HEPA-filtered vacuums to mitigate the dust.
- Step 3 (Primer Coat Application): Following concrete preparation, a moisture vapor barrier (like a moisture-mitigating epoxy) is typically applied as the primer coat. A polyurea may be used as the direct-to-concrete primer only if the moisture readings are very low. (To prevent any potential moisture problems, we set 1% as the upper acceptable moisture limit for use of a polyurea as primer).
- Step 4 (Broadcasting the Flake Blend): The customer’s selected flake blend is then broadcast in a full spread (“to rejection”) into the wet primer coat. This means the underlying primer coat is entirely covered in flakes – none of the primer is exposed (this is a good thing if a moisture-mitigating epoxy is used as primer given that all epoxy types can amber or fade when exposed to UV light).
- Step 5 (Flake Reclamation and Vacuuming): After a sufficient curing period, any unadhered flakes are reclaimed and the space is buffed (with a floor machine) and vacuumed to prepare for the subsequent clear top coats.
- Step 6 (Polyurea-Polyaspartic Topcoat Application): The clear polyurea-polyaspartic top coats are applied (we apply two separate coats). It is the polyurea-polyaspartic top coats that provide the UV, chemical and impact resistance that quick-curing polyurea-polyaspartics are renowned for. (In essence, commercial-grade applications use the best attributes of each coating type – a moisture-mitigating epoxy as the moisture-vapor-barrier primer coat and polyurea-polyaspartics as the durable clear topcoats).
Is there a benefit to hiring a professional for this work?
No doubt in our minds. A large percentage of our jobs are DIY and “1-day polyurea” redo’s. The coatings and equipment needed to do the job properly are commercial-grade and more expensive than DIY counterparts. Non-professionals typically don’t have access to commercial equipment and (despite DIY instructions) a simple acid-wash won’t create a good concrete profile. Additionally, DIY coatings don’t provide the same durability as commercial-grade coatings.
Also, based on the concrete moisture assessment, an array of coating types must be at the installer’s disposal. For moisture readings of 1 and above, a moisture-mitigating epoxy should be applied as the primer coat – not a polyurea (it’s the polyurea’s speedy cure rate in the presence of moisture that degrades its ability to properly penetrate the porous concrete). Professional installers have an array of coatings at their disposal and can use the right products for the unique concrete space – DIY applicators typically don’t.
Backing Our Promise
At Garage Floor Coating of Chicago, we stand behind our products and installation process with an industry-leading warranty covering all moisture-related issues and staining from automotive fluids and hot-tire transfer. Our unwavering commitment to excellence and customer satisfaction ensures that your garage floor investment is safeguarded.
While 1-day polyaspartic and polyurea coatings offer quick installation, they come with significant risks. We prioritize quality over speed, offering a superior solution through our proven Moisture Vapor Barrier system. Choose Garage Floor Coating of Chicago for a garage floor coating that truly stands the test of time.